Most of the updates to TeXLive that come from software package managers are quite delayed. Luckily, I found the best stack exchange answer ever that addresses this problem with full installation instructions for ‘vanilla’ TeXLive. After following them, everything works fine on Ubuntu 16.04
Category LaTeX
LaTeX: using fancyhdr with the memoir class
The fancyhdr LaTeX package allows you to put a fancy header or footer on your book, like this:

One of the nicest things about this package is that you can easily set the header to show the chapter name on odd pages, section title on even pages, and page numbers everywhere (or anything else you want to display). If you use this with the memoir class however, you can get compilation errors because both the memoir class and fancyhdr attempt to define the \footruleskip command when loading. So if you want to use fancyhdr with memoir, make sure to undefine the \footruleskip command before fancyhdr is loaded, but after memoir is loaded, ie:
\documentclass[11pt,twoside]{memoir}
\let\footruleskip\undefined %undefine footruleskip
\usepackage{fancyhdr}
Autocomplete BibLaTeX citations in TexStudio
Autocompletion of BibLaTeX citations in TeXstudio is a convenient feature, but I found it stopped working today. Doing the following seems to have fixed the problem:
- As with most bibliography related issues, it’s a good idea to start by deleting all the files in your compilation directory except the .tex and .bib files and recompiling everything
- Make sure you actually have autocompletion for BibLaTeX turned on. Go to options>configure TeXstudio>Completion and under “use following completion files”, make sure the box next to biblatex.cwl is checked.
-
Sometimes to be able to keep track of changes to the bibliography style, we separate the arguments to \usepackage[…]{biblatex} with line breaks, for example:
\usepackage[
		style=authoryear-comp,
		sorting=nyt, %sort intext by name year then title
		maxcitenames=2, %max intext authors
		maxbibnames=30, %max endtext authors
		url=false, %Dont print URL
		sortcites=true, %sorts intext citations
		backend=biber
	]{biblatex}
Apparently this can cause problems with the autocomplete feature. So try putting the whole command on one line, for example:
\usepackage[style=authoryear-comp,sorting=nyt,maxcitenames=2,maxbibnames=30,url=false,sortcites=true,backend=biber]{biblatex}Recompile and you should get some citations popping up when you start typing \parencite{ for example.
Export to bibtex format with special characters in Zotero
I use Zotero to manage my citations when writing in LaTeX. To do this, you need to export your library to a .bib file. However, if you have special characters (for example é) in your citation entries, they can cause problems when you are compiling the final document. In the past I solved this by running a find-and-replace on the exported .bib file, but I found a much better way from David Meyer. You tell Zotero to display a character encoding option when exporting the library, then export the library with Western character encoding.
Display character encoding option on export
- In Zotero, go to edit>preferences
- Click on the export tab
- Make sure the “Display character encoding option on export” option is checked
Export library with Western encoding
- In Zotero, go to file>export library…
- Enter the location that you want the .bib file to be saved to
- There should be a drop-down menu entitled “Character Encoding” where you should select “Western”
Now you shouldn’t have any issues compiling with cited authors named Thérèse for example.
Remove unused references from .bib file
Sometimes in LaTeX you are working from a .bib file that has a large number of reference entries, by the time you have finished working on your document, you might not need all of them. The following bash code generates a list of references cited with biblatex syntax in your .tex file (if you used bibtex syntax the code should be easily adjustable). In a unix terminal start with:
grep -oP '\\parencite\{\K[^}]+' introduction.tex > citations.txt #list contents of parencite commands
grep -oP '\\cite\{\K[^}]+' introduction.tex >> citations.txt #append contents of cite commands
At this stage you might like to go through the .tex document to find other citations with prefixes etc that would not match the grep call (ie search for “parencite[” and add results to citations.txt, not the most perfect solution – I know…).
replace commas with new lines, sort, print only unique entries, then remove empty lines with:
tr ',' '\n' < $citations | sort | uniq -u | grep -v -e '^$' > citationsSorted.txt
Then use this list to cut down your original .bib file to only the required entries:
for i in $(cat citationsSorted.txt); do grep -A 30 "$i" main.bib | sed '/^}$/q0'; done > mainCut.bib
or do the whole shebang:
citations=$(mktemp) && grep -oP '\\parencite\{\K[^}]+' introduction.tex > $citations && grep -oP '\\cite\{\K[^}]+' introduction.tex >> $citations && tr ',' '\n' < $citations | sort | uniq -u | grep -v -e '^$' > citationsSorted.txt && for i in $(cat citationsSorted.txt); do grep -A 30 "$i" main.bib | sed '/^}$/q0'; done > mainCut.bib
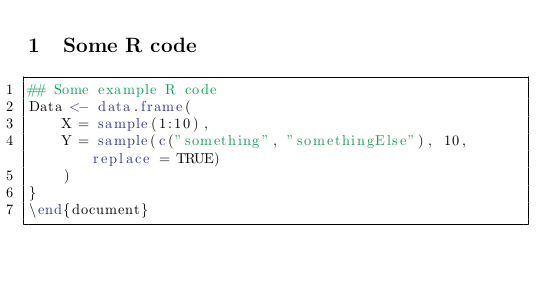
Including source code in LaTeX documents
Needed to include some R script in a document. Pasting straight in causes problems. Turns out the \listings package works well. Settings need to be tweaked a bit but otherwise easy to use. Can take other languages than R as input too.
% %Preamble
\documentclass{article}

\usepackage[usenames,dvipsnames]{color} % Important for r script boxes
\usepackage{listings} % Important for r script boxes

\begin{document}

 \lstset{
  language=R,                     % the language of the code
  numbers=left,                   % where to put the line-numbers
  backgroundcolor=\color{white},  % choose the background color
  frame=single,                   % frame around code
  rulecolor=\color{black},        % if not set, the frame-color may be changed on line-breaks within not-black text
  tabsize=1,                      % sets default tabsize
  breaklines=true,                % sets automatic line breaking
  breakatwhitespace=false,        % sets if automatic breaks should only happen at whitespace
  keywordstyle=\color{Blue},      % keyword style
  commentstyle=\color{Green},     % comment style
  stringstyle=\color{ForestGreen} % string literal style
}

\section{Some R code}
\begin{lstlisting}
## Some example R code
Data <- data.frame(
    X = sample(1:10),
    Y = sample(c("something", "somethingElse"), 10, replace = TRUE)
    )
}
\end{document}
\end{lstlisting}

\end{document}
Output:
LaTeX: automatic subfigures
Using the figsize package for sub figures within a thesis. The package is very simple to use, just tell it what layout in the format \SetFigLayout{number of figures high}{number of figures wide}, then load the figures with \subfigure. Figures will be resized with aspect ratio kept as default, but there are many options to play around with in the manual, including rotation, skewing aspect ratios, making some subfigures bigger than others etc..
\documentclass{article}
\usepackage{graphicx}
\usepackage{figsize}

\begin{document}

\begin{figure}
\centering
\SetFigLayout{3}{2}
  \subfigure[subfigure caption]{\includegraphics{example-image-a}}
  \hfill
  \subfigure[subfigure caption]{\includegraphics{example-image-b}}
  \hfill
  \subfigure[subfigure caption]{\includegraphics{example-image-c}}
  \hfill
  \subfigure[subfigure caption]{\includegraphics{example-image-a}}
  \hfill
  \subfigure[subfigure caption]{\includegraphics{example-image-b}}
  \hfill
  \subfigure[subfigure caption]{\includegraphics{example-image-c}}
  \hfill
\caption{This is a caption}
\end{figure}

\end{document}
Output:

LaTeX memoir class: adding definition footnotes
Add definition footnotes to your book/thesis in the memoir class with \footnote
\documentclass{memoir}
\usepackage{lipsum}

\begin{document}
\section{Stuff}
Spaghetti\footnote[1]{\textsc{Spaghetti:} \textit{pasta made in solid strings, between macaroni and vermicelli in thickness.}} \lipsum[2]


\end{document}


LaTeX: information boxes
A way to have basic information boxes, with automatic numbering for cross referencing is to use mdframed. Apparently this works well when the box needs to split across multiple pages. Useful for review papers, books and theses.
%% Preamble
\documentclass{article}
\usepackage{lipsum}
\usepackage[framemethod=TikZ]{mdframed}

%% Setting box counter
\newcounter{infobox}[section]
\renewcommand{\theinfobox}{\thesection.\arabic{infobox}}

%% Infobox style
\newenvironment{infobox}[1][]{%
    \refstepcounter{infobox}
    \begin{mdframed}[%
        frametitle={Box \theinfobox\ #1},
        skipabove=\baselineskip plus 2pt minus 1pt,
        skipbelow=\baselineskip plus 2pt minus 1pt,
        frametitleaboveskip= 7pt,
        frametitlebelowskip= 7pt,
        linewidth=0pt,
        linecolor=black,
        frametitlerule=false,
        frametitlebackgroundcolor=blue!10,
        backgroundcolor=blue!10,
        roundcorner=7pt,
    ]%
}{%
    \end{mdframed}
}

%% Document
\begin{document}

\section{Blah}
\lipsum[1]

\begin{infobox}[Major theories explaining blah]
\lipsum[3]
\label{info:theories}
\end{infobox}

Box \ref{info:theories} indicates theories explaining blah are
\lipsum[3]

\end{document}
LaTeX memoir class: variable chapter titles
Discovered another nice feature of the memoir class in LaTeX. Have three different length titles for each chapter of your book/thesis, one for the title page, one for the table of contents, and another short one for the chapter header:
\documentclass{memoir}

\begin{document}

\tableofcontents
\newpage

\chapter[Custom chapter title for table of contents][Very short running header]{Chapter title for title page}

\end{document}
